Wondering what WooCommerce webhooks are? Maybe you’ve seen the webhooks screen in your WooCommerce settings or you’re simply curious about how they work. Whatever the case, if you’re serious about growing your store it’s worth learning about webhooks.
Webhooks in WooCommerce are basically one way that you can send data to an URL when something happens in your store. It’s how WooCommerce can notify you about new orders in Slack, how stores can print a sticker for each new order, and how you can keep multiple systems and accounts in sync with your latest list of coupons.
In any case, it’s good to know how to use webhooks if you want to automatically push data from one app to another when customizing your WooCommerce site.
So in this post, we’ll go over the fundamentals of WooCommerce webhooks so you can start of creating and testing your own.
What is a WooCommerce Webhook?
A webhook is an event notification—known as a payload—sent to a URL you specify. You can configure webhooks to trigger events on one website to invoke behavior on another.
WooCommerce webhooks are useful for integrating the platform with third-party services and other external API that support them.
For example, in Robot Ninja we’re looking at using extending WooCommerce webhooks to implement a highly requested feature, which will automagically queue up tests for your store after any plugin or theme has been added or updated.
If you’re unfamiliar with webhooks and reading about them for the first time, it’s no surprise since they’re well-hidden in the WooCommerce settings.
Webhooks were originally introduced in WooCommerce 2.3 and can trigger events each time you add, edit delete orders, products, coupons or customers.
WooCommerce 3.5 introduced the Action Scheduler for delivering webhooks. This background processing library, which is used by the WooCommerce Subscriptions plugin, was merged into WooCommerce core to provide a robust, scalable, traceable job queue solution for processing large queues of tasks in the background on WordPress.
Action Scheduler is close to our heart since it’s a Prospress production. It’s already in use on thousands of WooCommerce sites as part of WooCommerce Subscriptions.
Creating WooCommerce Webhooks
To create a new webhook, go to WooCommerce > Settings > Advanced > Webhooks.
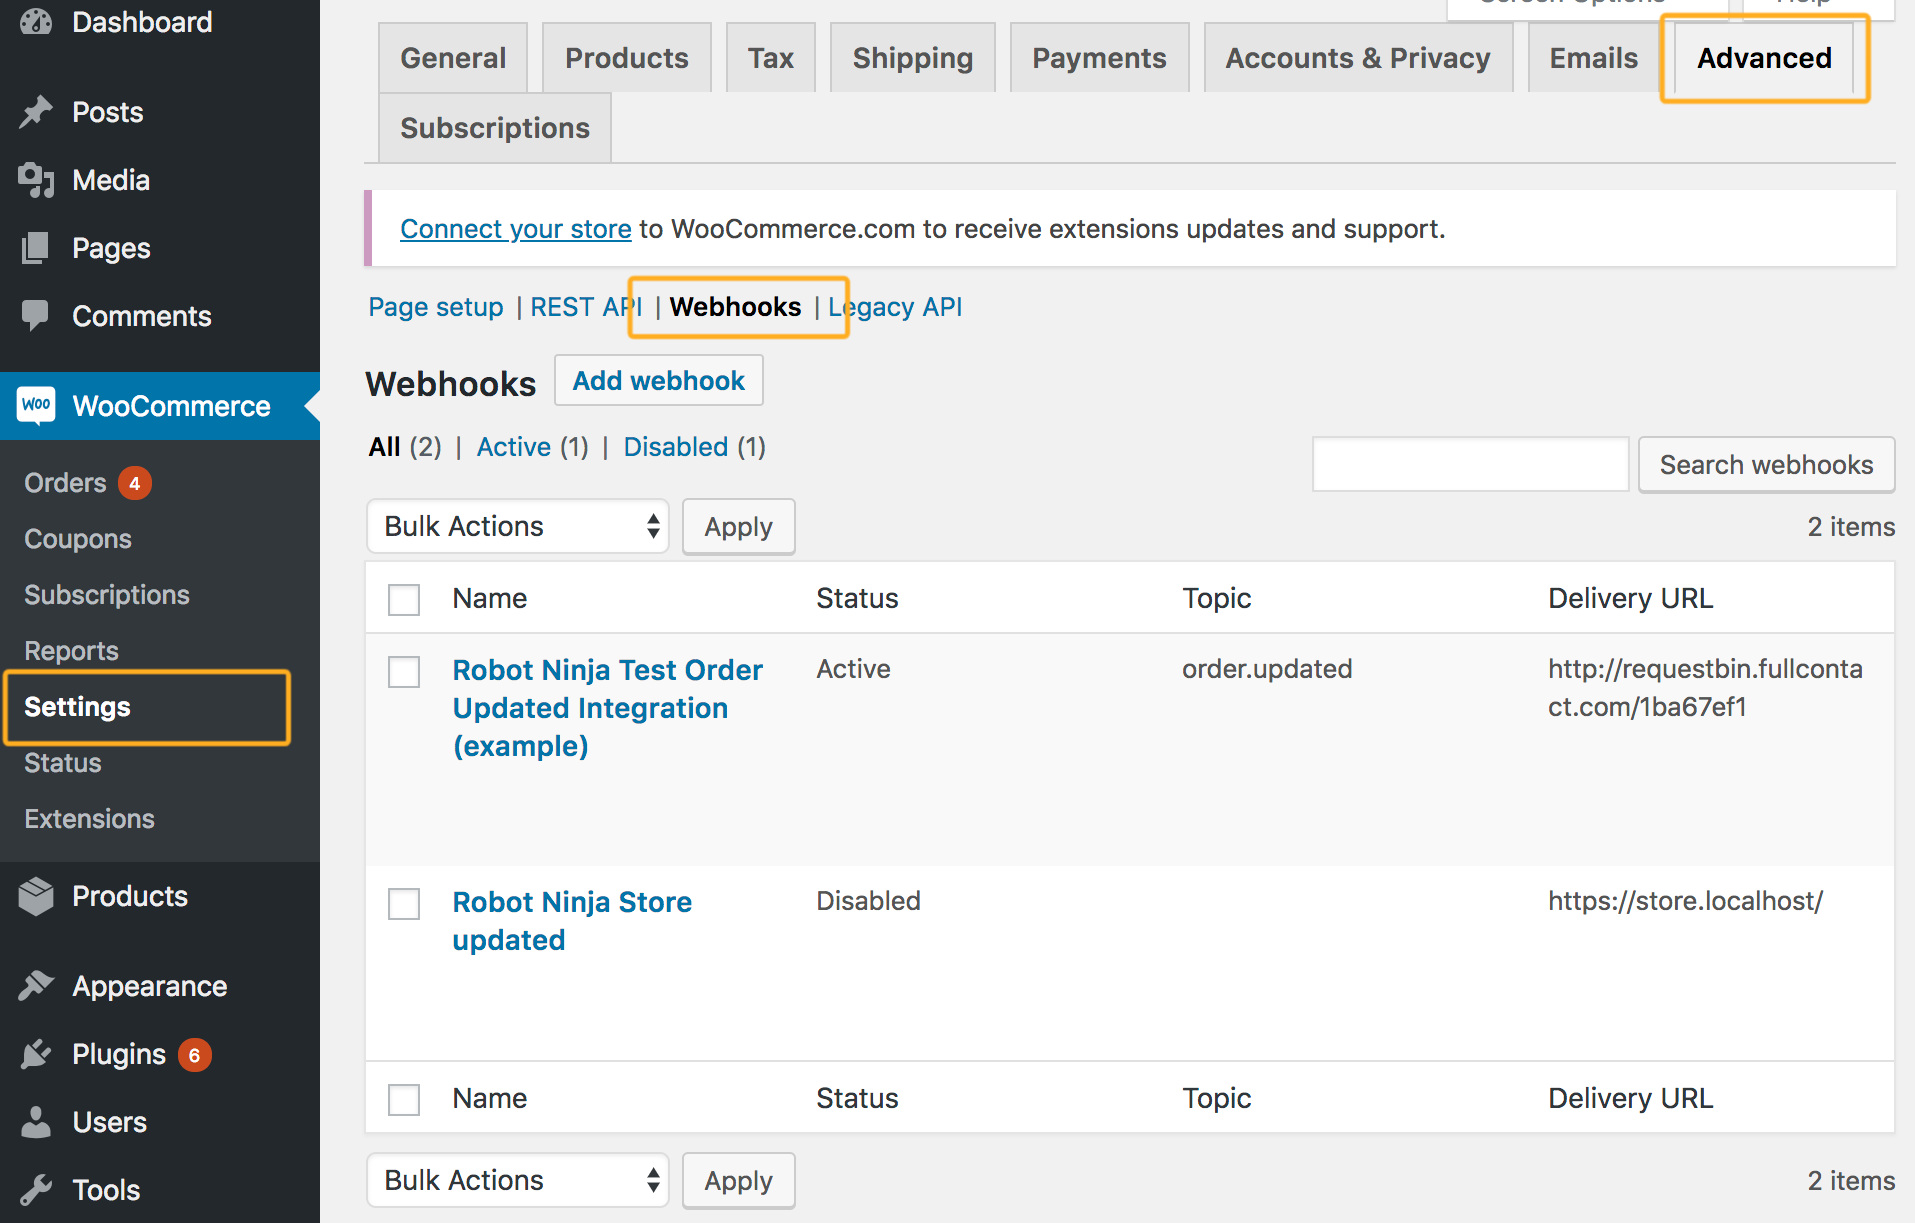
If you’re using a version of WooCommerce older than 3.4.0, you’ll find webhooks located in WooCommerce > Settings > API > Webhooks.
A webhook in WooCommerce is made up of several different components. Let’s break it down.
Name
The name of the webhook, which only store admins see. If left empty, WooCommerce will auto-generate a name, such as “Webhook created on [date and time of creation].” It’s useful to give your webhook a name that explains what it is for or what it does.
Status
There are three statues that you can assign a webhook:
- Active – Webhook payload will be sent when event is triggered.
- Paused – Webhook does not deliver.
- Disabled – A webhook is automatically set to disabled if it was previously active and there was an issue with the delivery.
Topic
This is an action, or trigger, for the webhook. In WooCommerce, there are 16 available topics to choose from. Any extras you see in your list will have been added by other plugins. For example, below you can see WooCommerce Subscriptions provides topics for creating, updating, deleting and switching subscriptions.
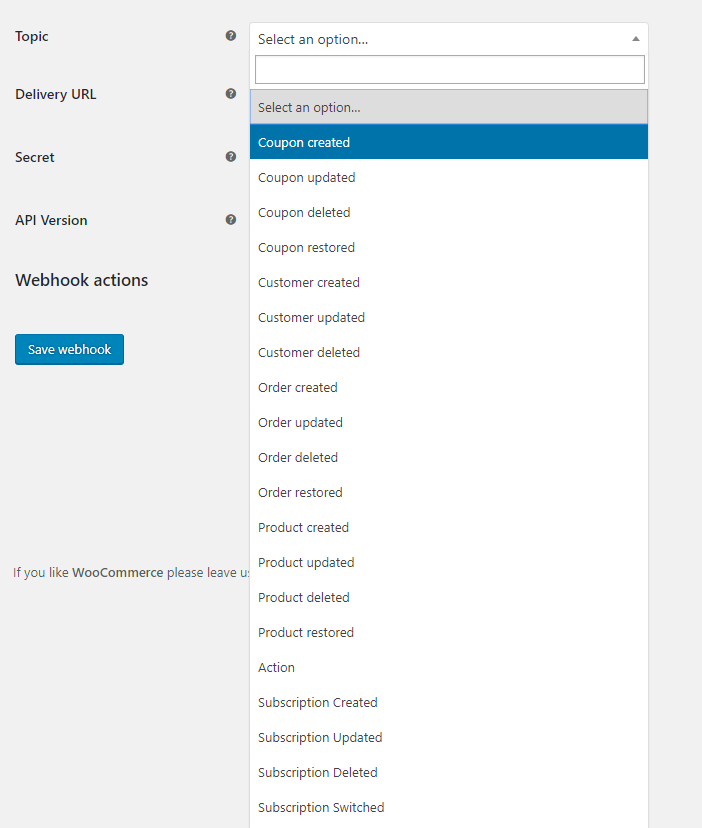
Topics usually describe an event or action associated with a WooCommerce object type—i.e. Coupon, Order, Product, or Customer—such as Order Created, Coupon Restored, etc.
If you select Action as your topic, a new field will display allowing you to create a webhook that is triggered when a WooCommerce action occurs. This topic opens up webhooks to be used in many interesting ways. For example, you could create a webhook that fires when the woocommerce_low_stock action occurs so you can automatically react and preorder new stock.
For a full list of WooCommerce hookable actions, check out the WooCommerce Docs Hook Reference guide.
Delivery URL
This is the URL you want the payload to be sent to. Payloads are sent as POST requests to this URL.
Secret
The secret key generates a hash of the delivered payload and is provided in the request headers. If you leave this field empty, it defaults to using a consumer key for the currently logged in admin user.
API Version
The API version allows you to choose which format the payload will be delivered in. For the most part, using the default option is perfectly fine. If you’re creating a webhook for some third party integration that only supports the legacy v3 version of the API, then you can set the data to that format.
Testing WooCommerce Webhooks
Before we dive into testing webhooks in WooCommerce, it’s important to know that webhooks delivery happens in the background. This means that a webhook will first need queued and the job processed before you’ll see the delivery of the webhook.
For testing purposes, you can choose to have a webhook deliver the payload immediately using the following snippet:
apply_filters( 'woocommerce_webhook_deliver_async', '__return_false' );
For the purposes of this post, we’re going to stick to the default async behavior, and the webhook we’re going to use is with the topic Order Updated.
When you first activate any new or existing webhook, WooCommerce will immediately try to send a test POST request with the new webhook ID as its payload. This is to check the delivery URL is working at the time of activation. If this request fails, the webhook will not be activated and will be set to disabled.
To help with testing webhooks, you need to know how to first trigger the webhook and, for the most part, the topic should be fairly self explanatory in terms of how to do it:
- Order Updated:
- Purchase an order via the checkout
- Change a billing address on an order using the “Edit Order” admin page
- Update the order’s status
- Customer Created
- Create a new user with the customer role
- Product Restored
- Trash a product and then restore it
Let’s run through the steps required to test a webhook.
1. Visit RequestBin and create a fresh bin for testing. Keep your browser tab—we’ll need this bin URL in a moment.
2. Return to WooCommerce and create a new webhook if you haven’t already. In the “Delivery URL” field, paste in the bin URL you created with RequestBin.
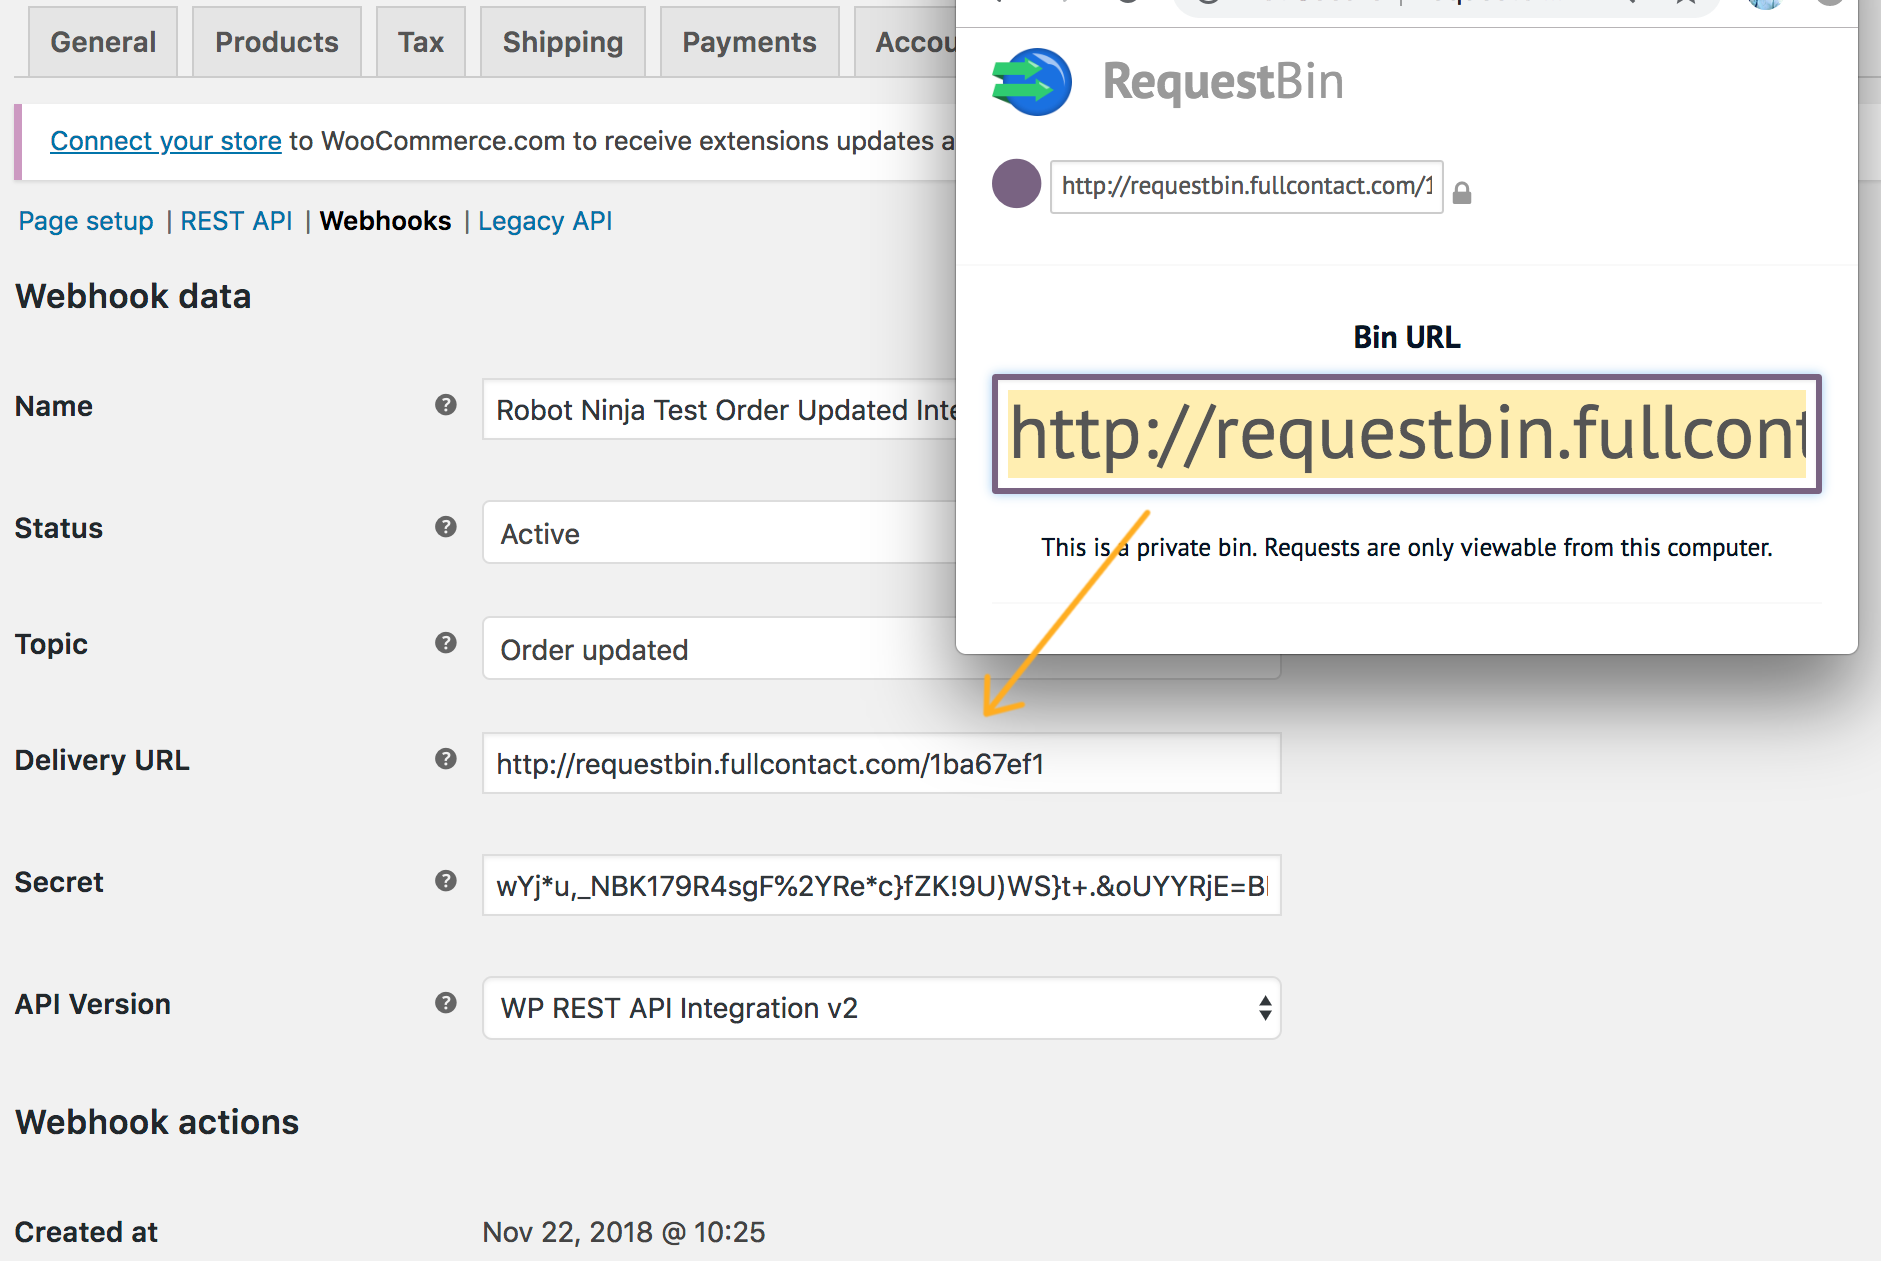 3. Fill in the other fields for your webhook, set a topic—in this case, “Order updated”—and make sure your webhook is set to “Active” before saving.
4. Run through the steps required to trigger your webhook. For this example, since we’re testing Order Updated, we need to:
- Go to the orders table.
- Update the order status. I’m updating the status from “processing” to “completed” for order #1238.
- Click “Update.”

5. Since webhooks are sent in the background, wait a minute and then refresh your Edit Order page to trigger the queued event.
6. Next, open the RequestBin URL and refresh the page. You should see the details of the request that was sent along with the payload data.
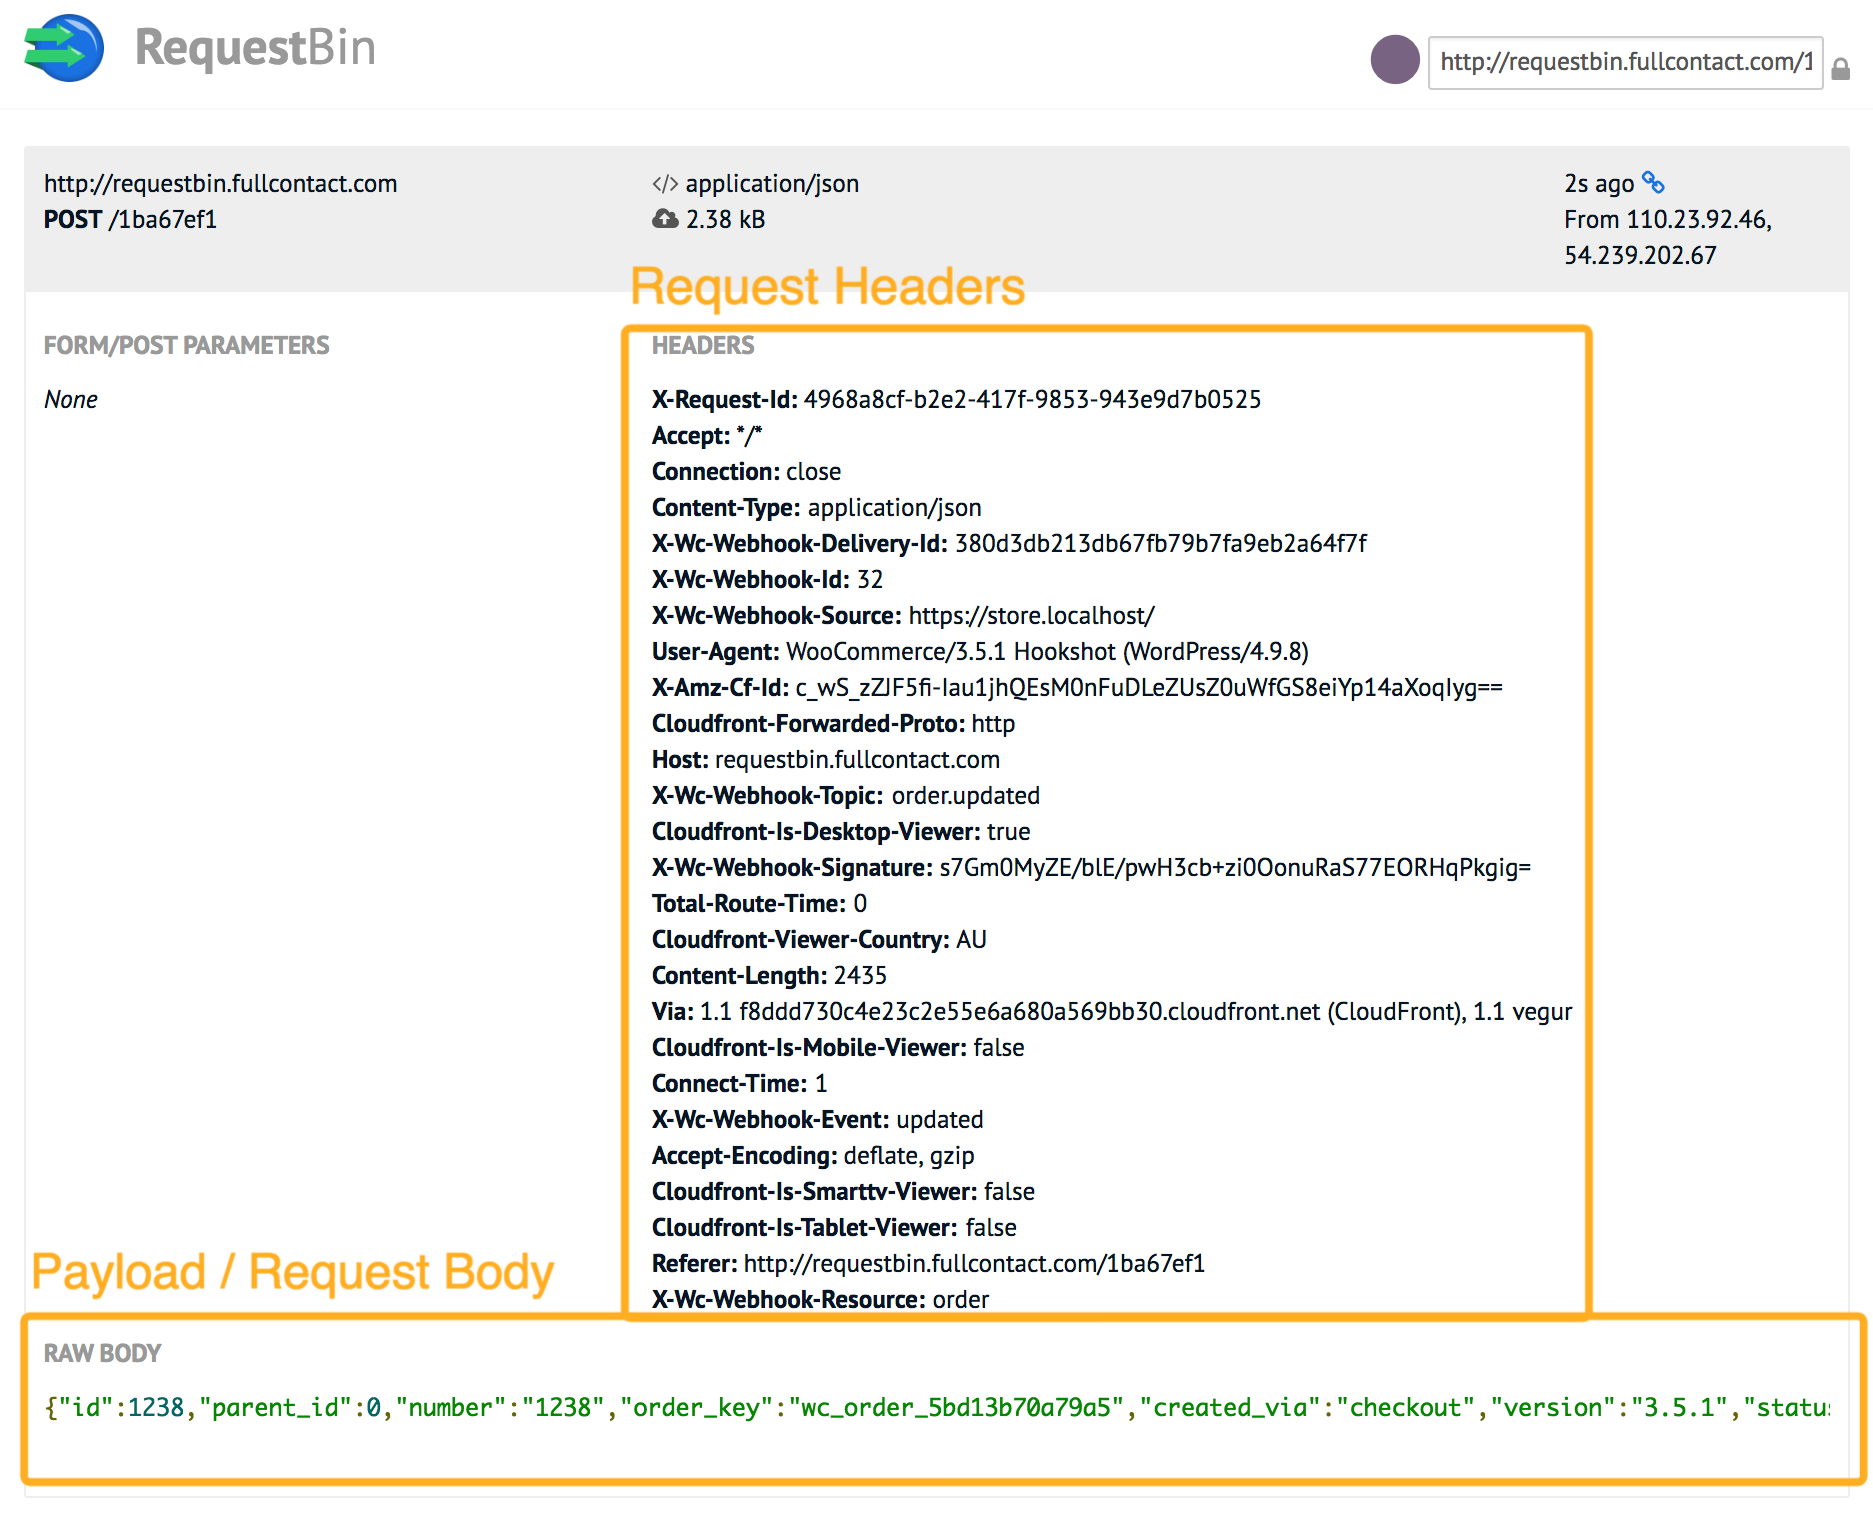
Tools for Testing WooCommerce Webhooks
For the example above, I walked you through how to use RequestBin, a popular request collector, which I’ll explain in more detail. I’ll also go over a couple of other useful request collector and testing tools.
1. Request Collector
Request bins (aka request collectors) are designed to help with collecting, inspecting and debugging HTTP requests and webhooks.
RequestBin, which we used above, is one such tool. Others free options include PostBin and Webhook Tester.
Request collectors are great for making sure webhook delivery is working and the payload data is correct. Since these free tools are online service, I recommend only testing webhooks using non-sensitive data.
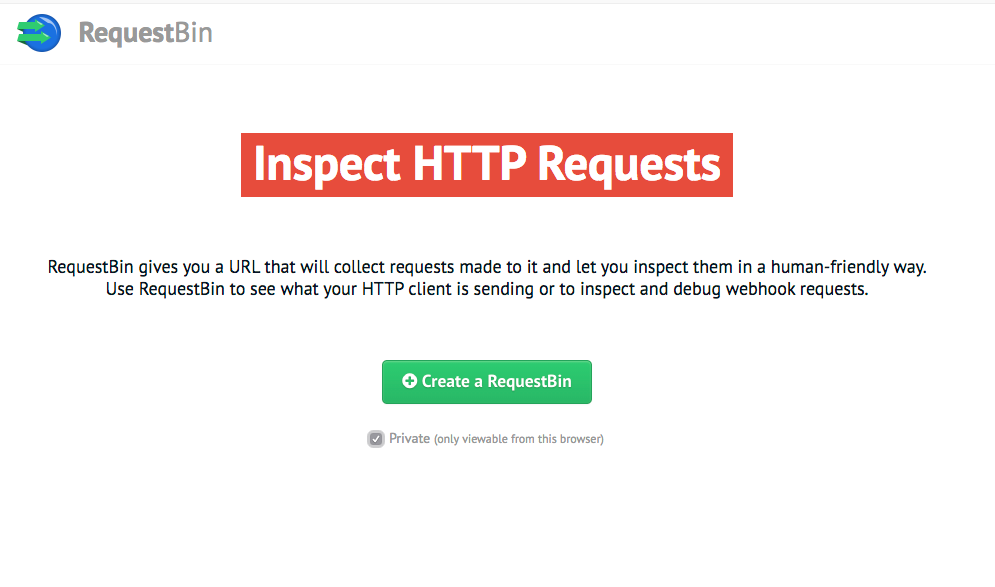
RequestBin allows you to create a private bin, which will hold up to 20 requests for up to 48 hours. After that time, your requests will no longer be accessible, which is perfect for when you just want a quick or temporary solution for testing webhook delivery.
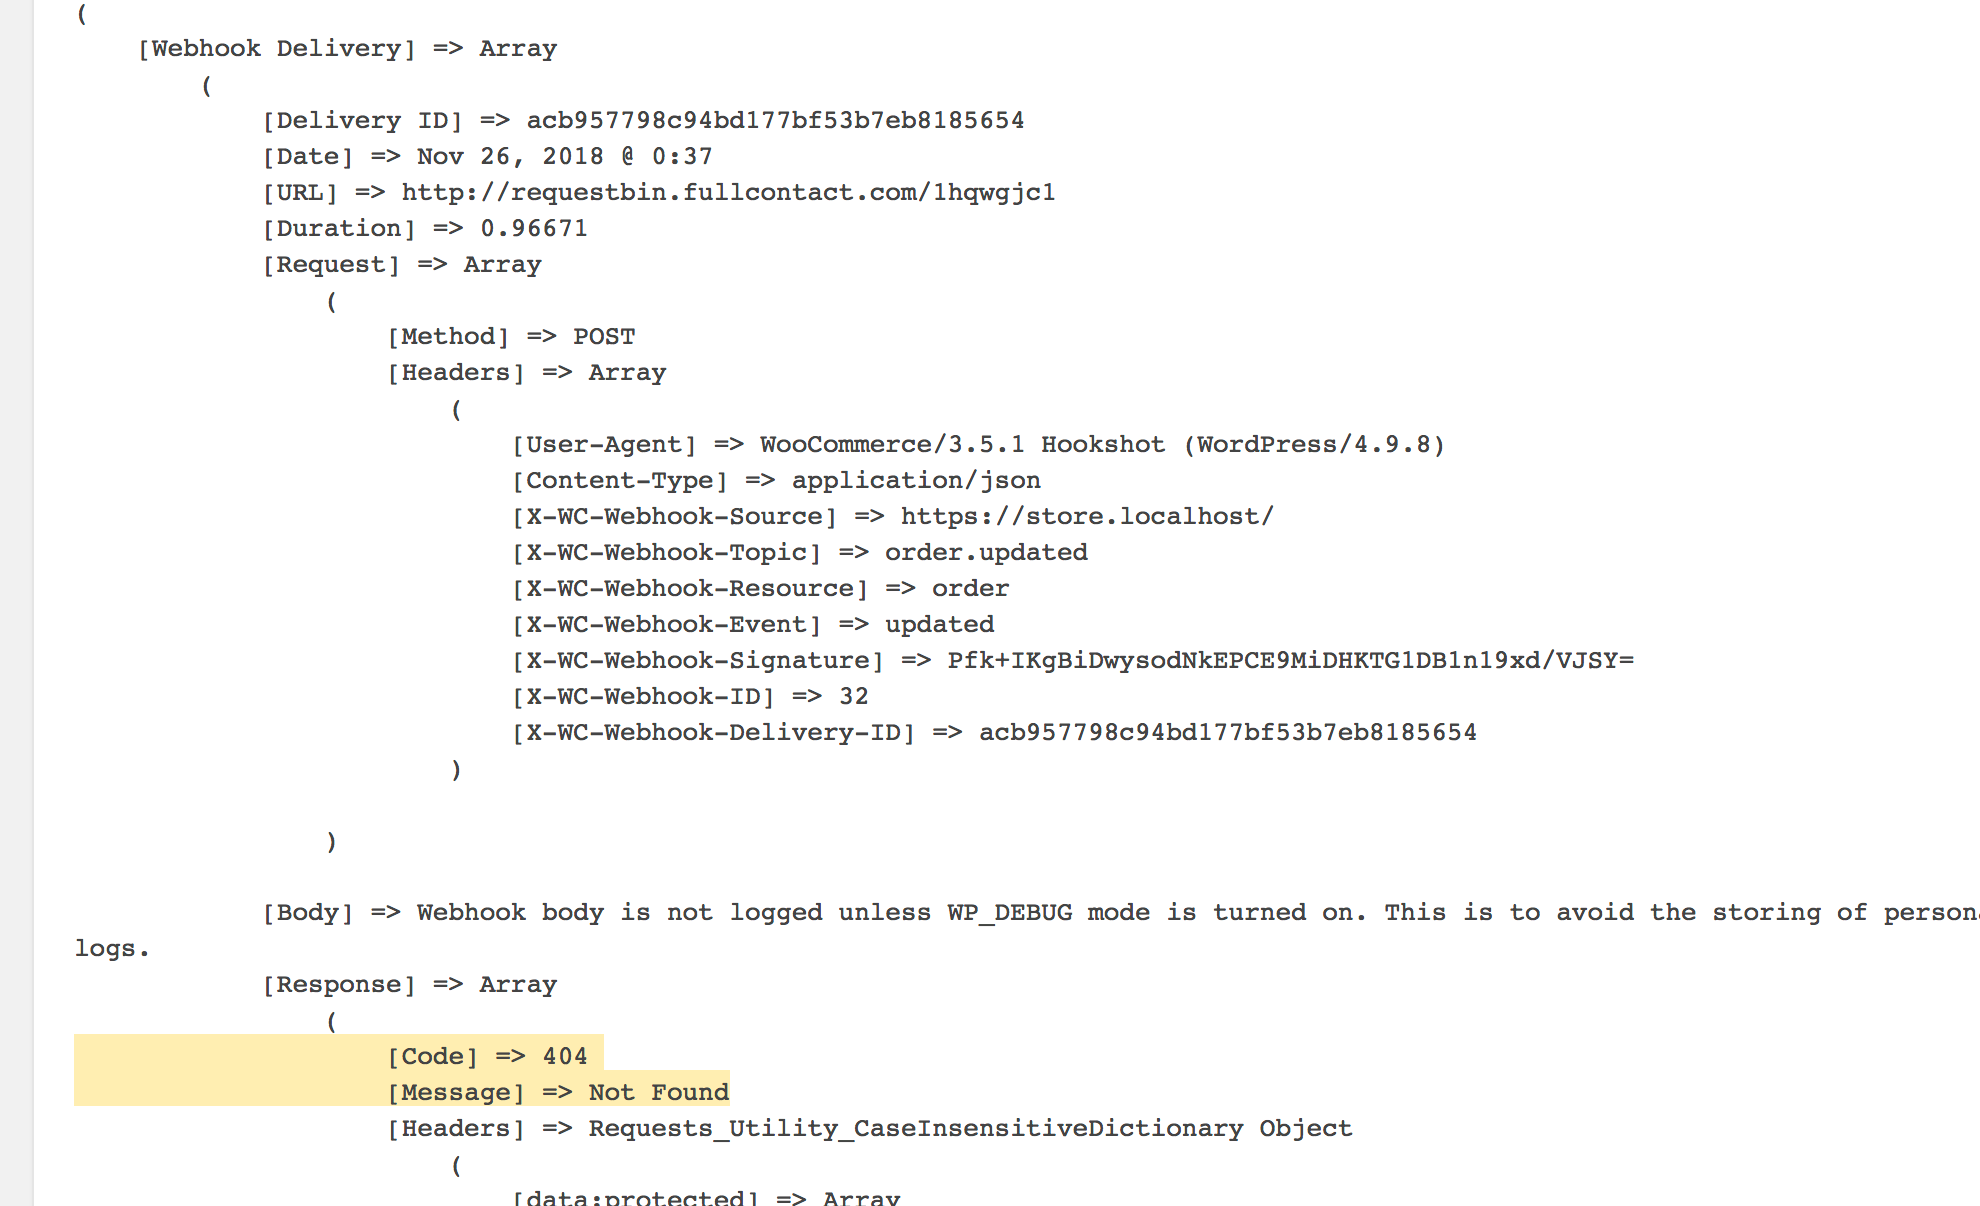
When a webhook is sent to a request collector URL, you’ll be able to see the request headers and body. But more on this below.
2. WooCommerce Logs
WooCommerce’s logs let you see what a webhook request looks like in terms of headers and data sent, and what was returned from the response. If you’re testing a webhook with a real delivery URL, it’s a good idea to check here to confirm it’s working.
To access webhook logs, go to WooCommerce > Status > Logs and use the dropdown to pick the webhook log you wish to view.
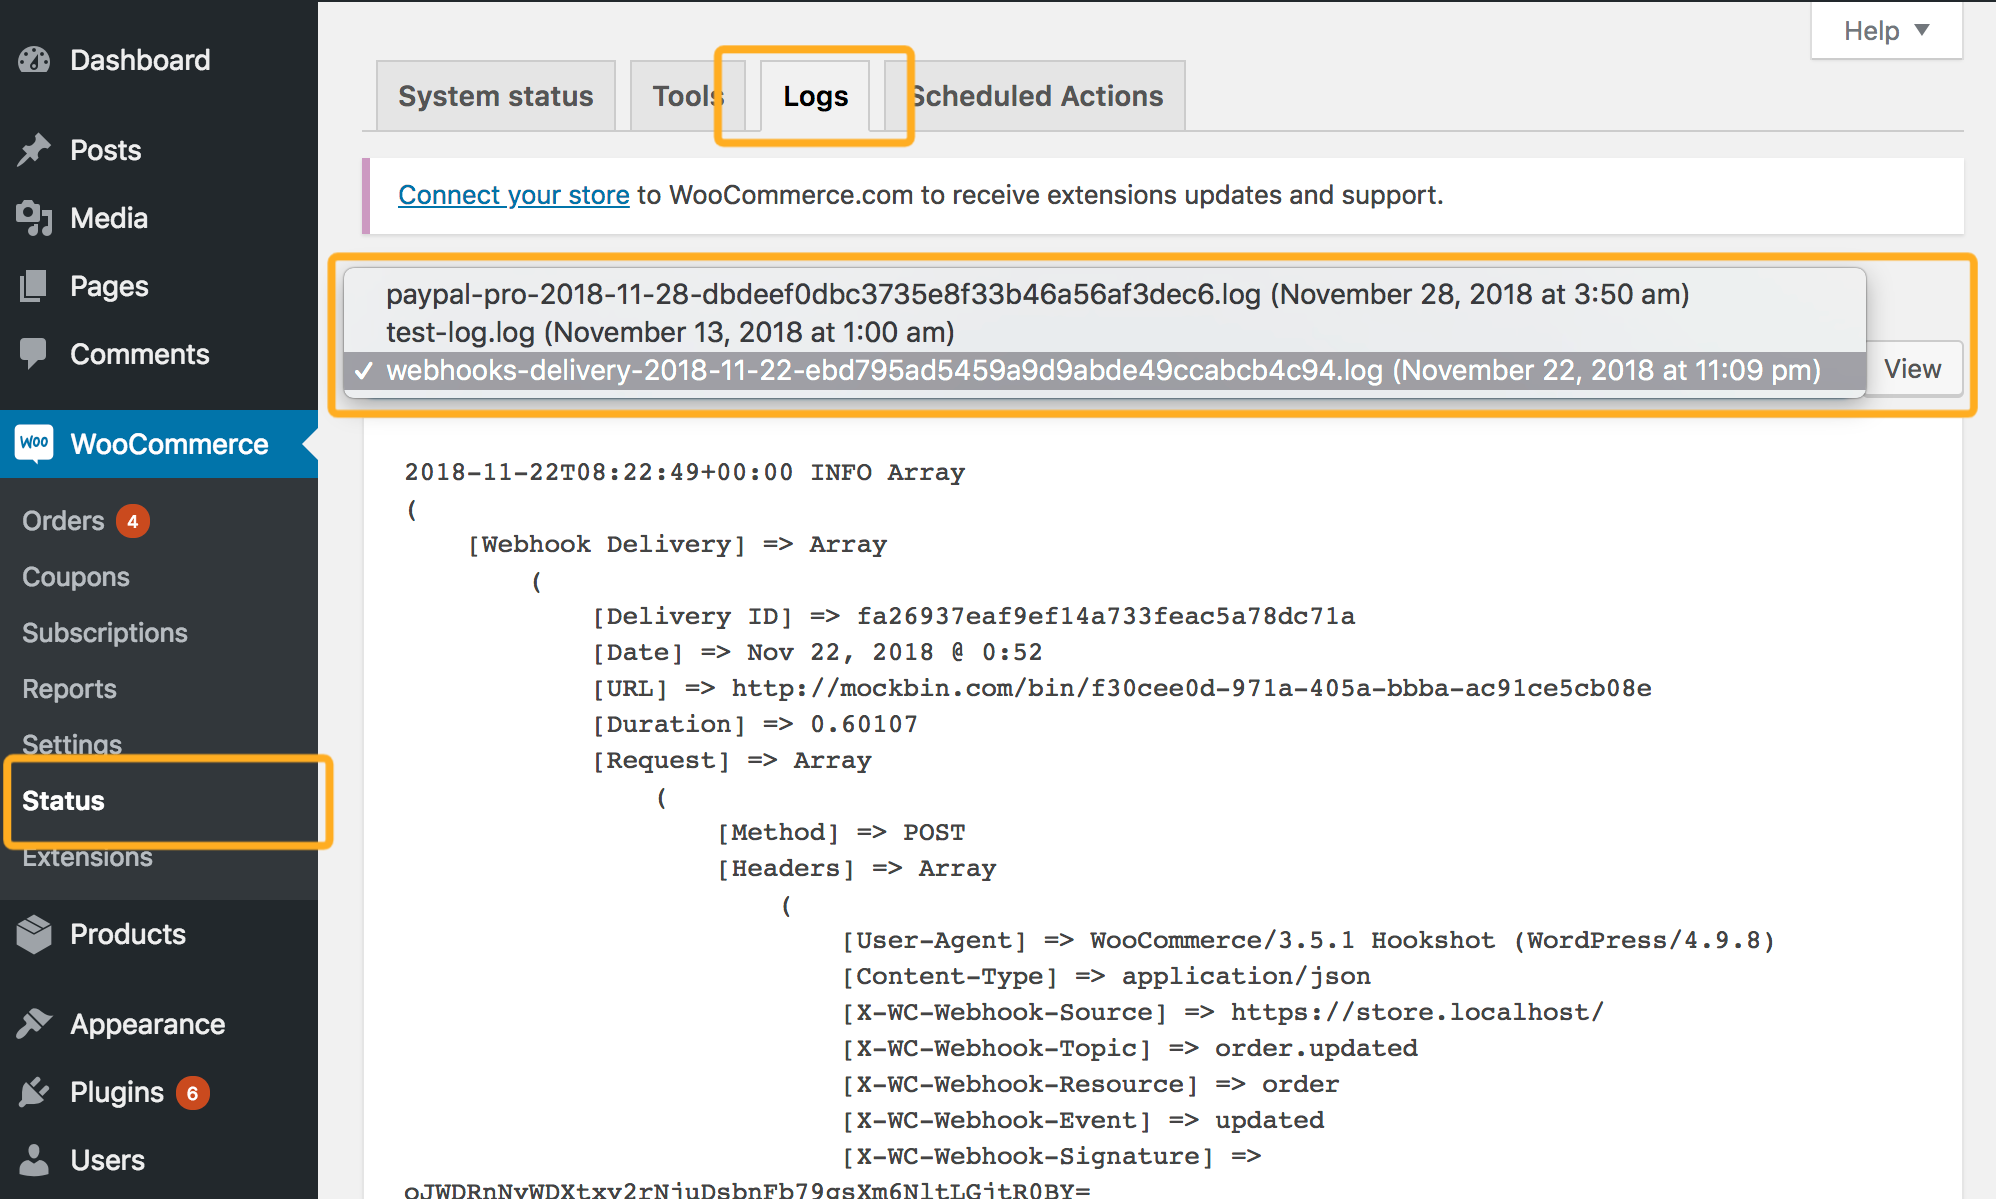
If you don’t have WP_Debug set to true in your wp-config.php file, WooCommerce logs will not display the webhook payload data to avoid logging sensitive order, customer and other post data.
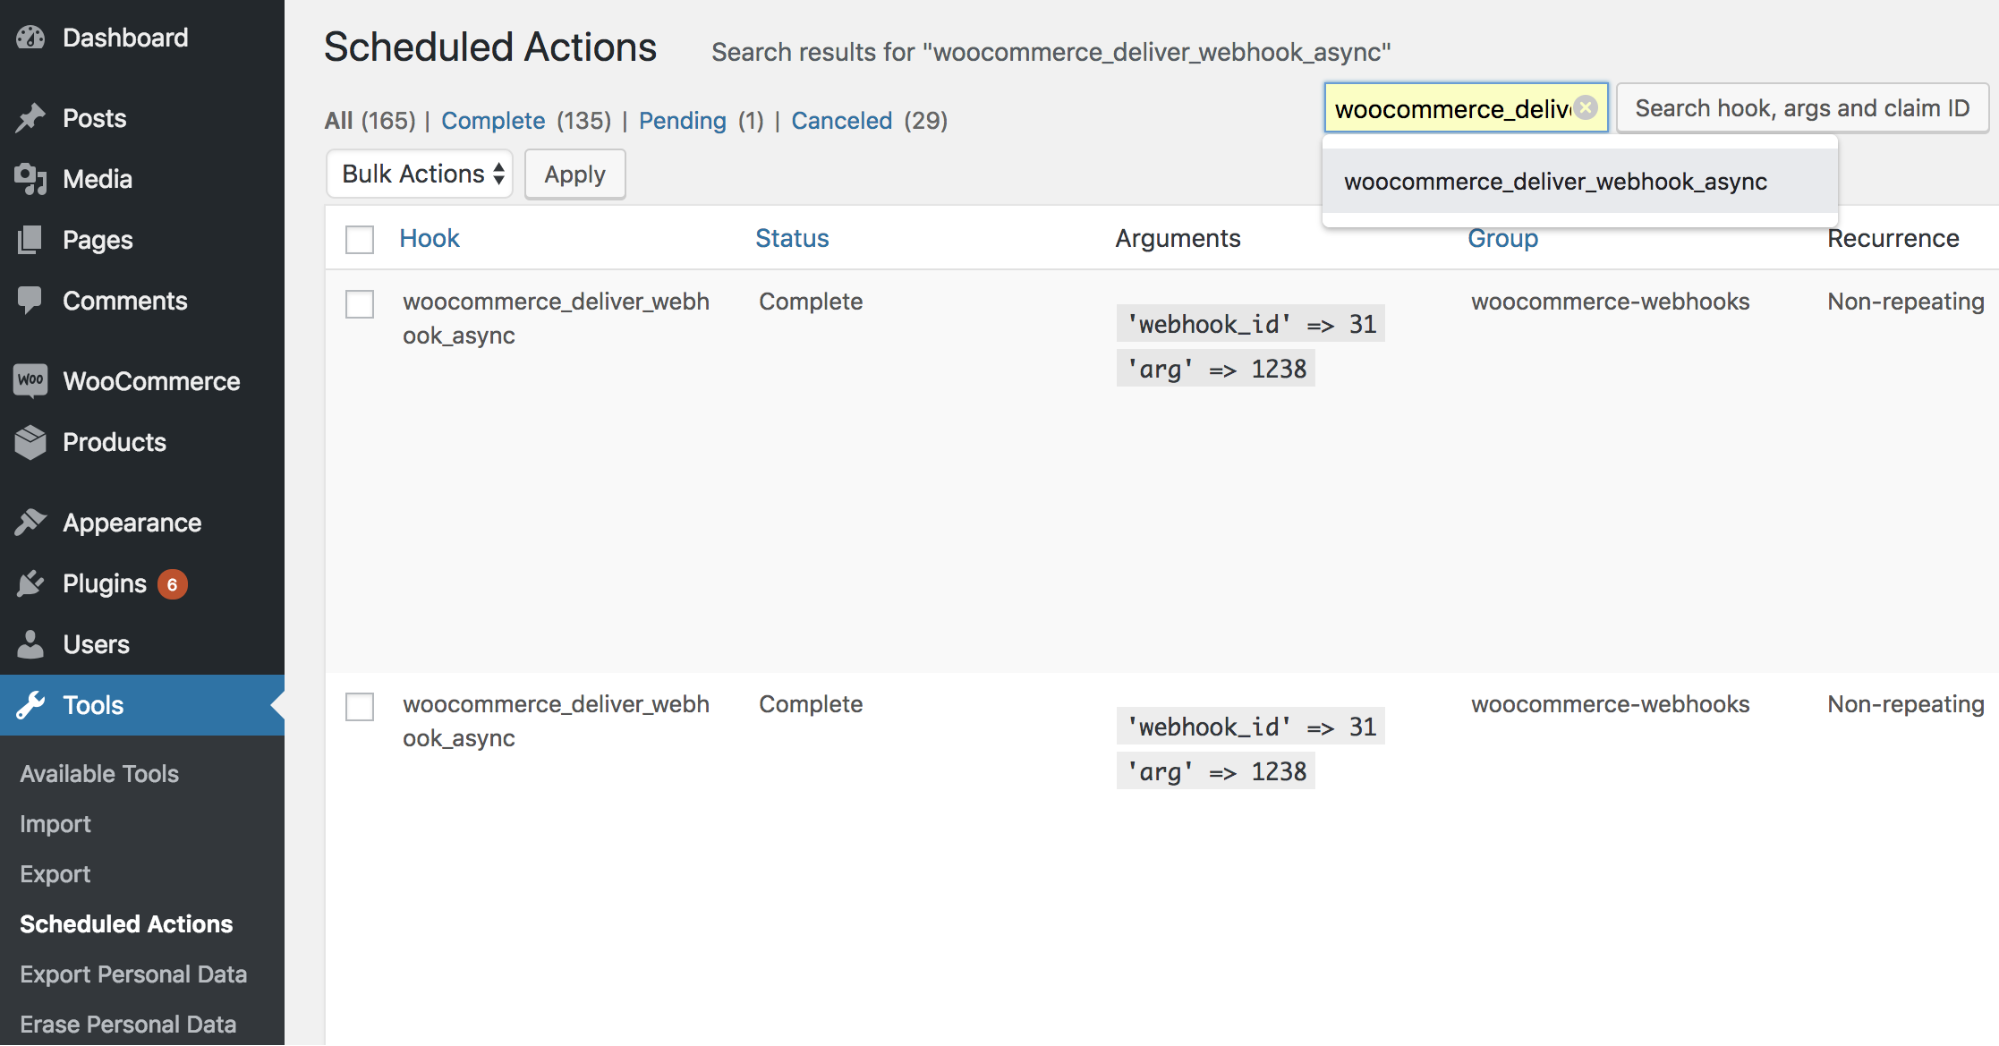
3. Action Scheduler
Since WooCommerce 3.5.0, webhooks are now triggered and sent asynchronously (in the background) using the Action Scheduler.
With the Action Scheduler now bundled into WooCommerce, you can find everything you need to know about the queueing and sending of your webhook events. Just go to Tools > Scheduled Actions to see your data.
Debugging Common WooCommerce Webhook Issues
Once you’ve got your webhook up and running, you might find that at some point you run into issues. There are many causes for webhooks issues, but here are some of the more common ones along with methods you can use to fix them.
Issue #1: Can’t Activate a Webhook
When you activate a newly created webhook, or one that has never been activated before, WooCommerce will immediately test the delivery before allowing it to be activated.
To test the connection, WooCommerce will try to send some data to the delivery URL and if the request doesn’t return a 200 OK response code, the webhook will be given a “Disabled” status.
To help you debug this issue, WooCommerce will display a message with the reason for the error:
- Delivery URL cannot be reached: <reason>
- Delivery URL returned response code: <code>
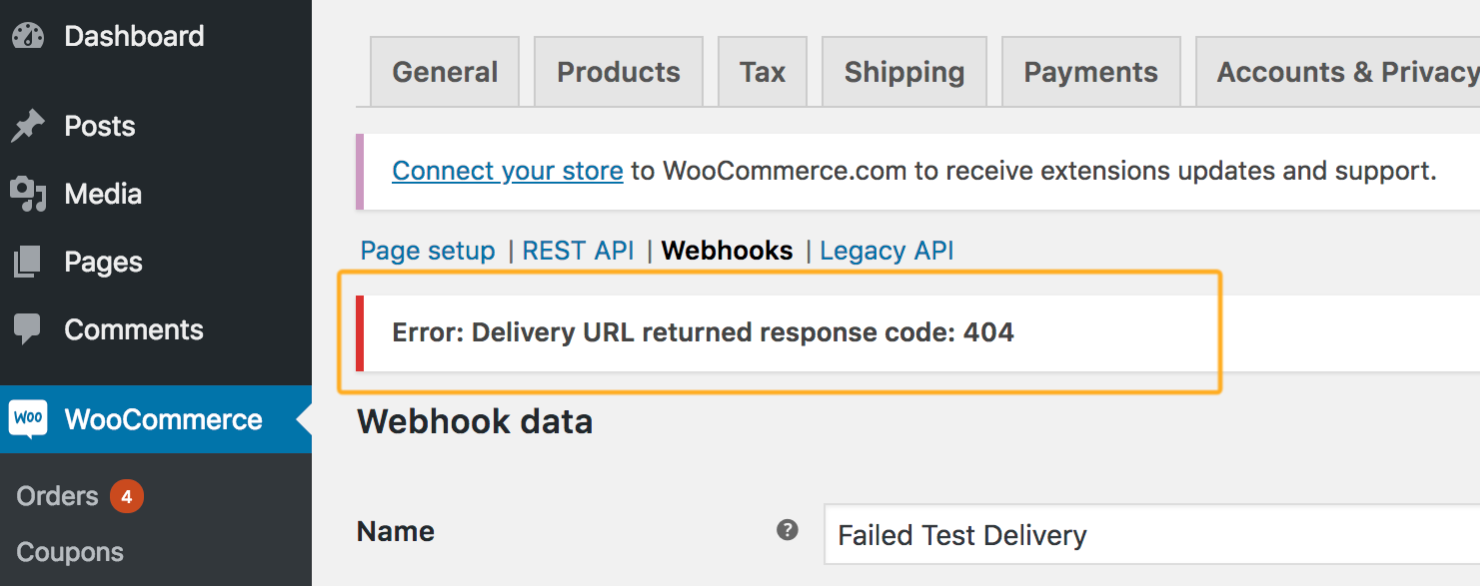
If the error is related to response codes, here are some common error codes and their meanings:
- 401 – Bad Request: This depends on the delivery URL, but if the webhook is pointing to a third party URL, a 401 typically means the request has invalid data.
- 403 – Forbidden Access: This can mean the request was unauthorized to access the given URL. (Firewall and security plugins can sometimes be the reason for this.)
- 404 – Not Found: The URL doesn’t exist.
Issue #2: Webhook Switches to Disabled After Each Test
WooCommerce will automatically disable any webhooks that respond with an error. To find out exactly what the error was and why it was disabled, the simplest way to find out is to take a look at your WooCommerce logs.
Every WooCommerce webhook delivery is logged (even successful webhooks) along with details of the request and response, which should provide plenty of information to help you work out what went wrong and why.
The log files can get pretty large if you’re running many different webhooks, so searching for webhook IDs or searching for delivery URLs will help find the logs you’re looking for more quickly.
You’re Ready to Start Testing Webhooks
The best way to really understand how webhooks work is to try creating on. Once you’ve got a webhook up and running, you can use the free tools mentioned above—request collectors like RequestBin, WooCommerce logs, and Action Scheduler—to test your webhook and ensure it’s working properly.
For more on developing with WooCommerce, check out our guide: WooCommerce Developer’s Toolbox: 10 Tools We Use at Robot Ninja.
If you have any questions about how webhooks work, or how to test them, leave a question in the comments below!
Great article Matt! Thanks for writing this. I did have one question for you related to our scenario. We have an webhook set up on Order Created. It sends the payload to a webservice a 3rd party setup which queues orders to go into our client’s SalesForce system.
The issue we run into from time to time is if a customer places an order and the credit card is declined (or they fat fingered a number). Woocommerce creates the order which triggers the webhook with a status of “failed” or “pending”. If then the customer corrects the card number or uses a different card, the already created failed order is updated and then moved to “processing”. However, the webhook is not resent since the order is already created. The client has to manually enter those orders into SalesForce.
Do you know of a method to only send a webhook upon a “successful payment” being completed and have Woocommerce send the standard JSON data payload it normally sends when Order Created is triggered?
Just thought I’d ask in case someone else out there has ran into this scenario. Also a couple of useful online tool sites we’ve used are Hookbin.com and JSONCompare https://jsoncompare.com/ to compare JSON output structures.
THANK YOU!
Hi John,
I appreciate your comment and thanks for sharing your question/scenario 🙂
Have you looked into using the
order.updatedwebhook instead of the order created? I’m assuming you’ve already considered that option and it won’t work with your third party services or something of that kind?In that case I’m afraid I don’t know if there’s a simple to answer your problem – but I’m happy to share my thinking.
With WooCommerce webhooks you can filter when a payload is delivered using
woocommerce_webhook_should_deliverfilter. So in your case, you could try using aorder.updatedwebhook but filter when the payload is delivered so that it’s only when the order status is updated to processing or completed and something like thedid_action( 'woocommerce_payment_complete' )was ran – this is saying the order received a successful payment.Hard to say this will work for your specific case but maybe it will be enough?
You could also potentially just create a webhook using the
woocommerce_payment_completeaction hook e.g.: http://pic.pros.pr/8ff858e7c484You would need to add custom code to make sure the payload is in the proper format but that can be done using the filter
woocommerce_webhook_payload.Hope some of this helps or at least puts you on track to finding a solution that works for you.
Thanks again for reading the post
Great article! I have a question also, I’m getting on the response [Code] => http_request_failed [Message] => cURL error 52: Empty reply from server [Headers] => Array.
I think something is blocking the webhooks on my side. I have disabled wordfence and cloudflare, any ideas?
Thanks Daniel,
Apologies for the delay and sorry to hear of the issues you’re having with using webhooks.
Unfortunately I can’t say I’ve seen this particular issue but it sounds like it’s occurring when WooCommerce tries to make a test request to the delivery URL you have specified upon saving the webhook.
Based on the error message, it looks like the issue may be due to either coming from the delivery URL or some server configuration and/or firewall.
Here’s some things you can do to try diagnose what the issue is:
wp_safe_remote_post(), you could try filter the args to set thereject_unsafe_urlsarg tofalse. There’s some discussion on this and example code found on the WooCommerce repository found here.I don’t fully recommend keeping the
reject_unsafe_urlsfilter but I would suggest temporarily trying it to see if it fixes the issue.Hope this helps!
Awesome article. Do you have any suggestion for when the call back woocommerce_payment_complete, does not seem to call, even when you add a
add_action( ‘woocommerce_order_status_completed’, ‘myfunction’, 1);.
I use woosubscription (love it btw) and the subscription payment is coming through, but my function is never called. Could this potentially fix the problem?
Great Article Matt,
In my scenario, i have created a webhook for order created. But the issue is, if i logged in as admin and orders, it works fine but when i try ordering as a customer then no webhooks are fired, and in the logs also no logs are generated for non-admin users.