XPath is a powerful language that is often used for scraping the web. It allows you to select nodes or compute values from an XML (or HTML) document and is one of the methods you can use to define Custom Selectors within Robot Ninja when you need to customize what it looks for when testing your store.
The other method you can use to customize Robot Ninja tests is by using CSS, i.e. classes, ids. While CSS selectors are a popular choice, XPath is far more powerful, albeit with a much steeper learning curve.
In this post, we’ll take a look at what XPath is, how it works, and how you can use it for Custom Selectors with Robot Ninja.
What is XPath?
XPath (XML Path Language) is a query language for selecting nodes from an XML document.
It can also be used to compute values (strings, numbers etc) from the content of an XML document (but this is not going to be the focus of this post).
The XPath language is based on a tree representation of the XML document, and provides the ability to navigate around the tree, selecting nodes by a variety of criteria.
What is XML?
XML stands for EXtensible Markup Language:
- It’s a markup language much like HTML but HTML != XML.
- It was designed to describe data.
- XML tags are not predefined in XML. You must define your own tags.
- XML is self-describing.
- XML uses a DTD (Document Type Definition) to formally describe the data.
Here’s an example XML document:
Looks pretty similar to how you’d write HTML markup, right?
XML and HTML
Without delving too deeply into the technicalities or semantics of HTML, XML and XHTML (and getting myself into trouble – there is a good resource here on that topic) I’ll simply say that XML and HTML have a very similar structure to XML, which is why XPath and CSS selectors can be used almost interchangeably to navigate both HTML and XML documents.
HTML and XML are like cousins. They are related enough that they look very similar (and could be mistaken for one another) and as a result XPath can be used to query HTML document (in most situations).
The main differences between XML and HTML are:
- XML is not a replacement for HTML. XML and HTML were designed with different goals: XML was designed to describe data and to focus on what data is, while HTML was designed to display data and to focus on how data looks, i.e. HTML is about displaying information, XML is about describing information.
- XML tags are not predefined like HTML tags are. For example in HTML we have predefined tags for
<html>,<head>,<body>whereas in an XML document you could be describing anything.
To contrast with the above XML example, an example HTML document would like the following:
The Basics
An XML document follows basic syntax rules:
- An XML document is structured using:
- Element nodes e.g.
<title>,<author>,<year> - Attributes (attribute notes) e.g.
lang,category - Text (text notes) e.g.
Oathbringer
- Element nodes e.g.
- XML element nodes must have an opening and closing tag e.g.
<bookstore>and</bookstore> - XML tag names are case sensitive e.g.
<bookstore>does not equal<bookStore> - Element nodes can have child elements. These must be properly nested (every child element that is opened must also be closed)
- XML attribute (like
langin<title>above) have a name, and a value that is quoted.
In contrast, some of these same rules are relaxed in HTML:
- Tag and attribute names are case insensitive e.g.
<title id="page-title">equals<Title ID="page-title"> - Some elements are closed automatically
- Attribute values don’t need to be quoted
The important thing to be aware of is that regardless of these relaxed rules, both XML and HTML can be represented as a tree of nodes – a tree structure.
What is a Tree Structure?
A tree structure is formed when viewing each node in an XML/HTML document and its child nodes as a hierarchy of nodes.
Consider the HTML document example above.
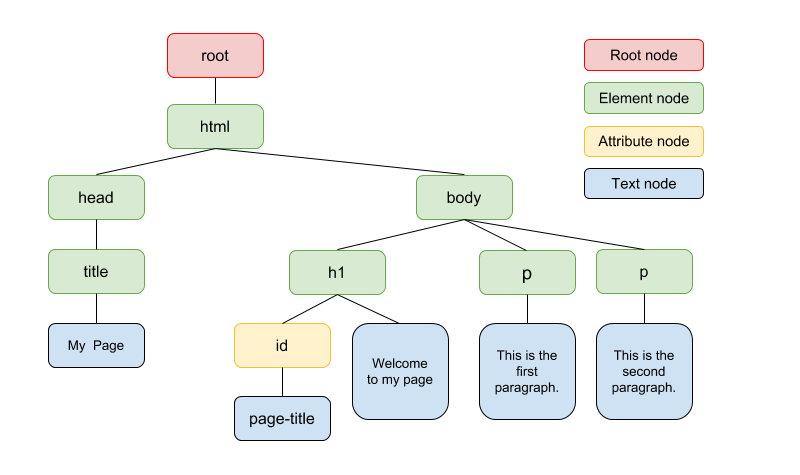
- Root node: At the top of the tree we have a root node. This node is not part of the document itself. It is is parent of the
<html>element node. - Element nodes: These nodes represent HTML elements/tags e.g.
<html>,<head>,<title>etc. - Attribute nodes: These nodes represent attributes from an element node, e.g. the
idattribute on the<h1>tag. - Text nodes: These represent the text enclosed in an element node e.g. the “This is the first paragraph.” within
<p>and</p>tags.
Distinguishing between these different types of nodes is good to know for understanding how XPath expressions work.
XPath Expressions
In popular use (though not in the official specification), an XPath expression is often referred to simply as “an XPath.”
These expressions define what nodes are selected. The most common type of expression (that we’ll cover the basics of in this post) is a location path.
A location path has a straightforward but often verbose syntax consisting of a series of “steps.”
The result of evaluating a location path expression is the node-set (set of nodes) containing all the nodes that match the steps from left to right.
There are two kinds of location path expressions: relative location paths and absolute location paths. These concepts are similar to relative and absolute URLs (or navigating around a directory structure on the Unix command line) where the expressions can be applied against an initial starting context (in this case an initial node-set) or from the tree root.
Your First XPath: Selecting a Specific Element
Let’s begin with a basic example:
/html/head/title
The / prefix indicates an absolute location path starting at the root of the tree.
This location path has 3 steps separated by slashes (/).
So roughly, we would evaluate this as: start from the html element, look for a head element underneath, and a title element underneath that head.
Select All Children
/html/body/*
The * here indicates that all children elements of the context node should be selected.
In our HTML example this would be the <h1> and both <p> elements with in the <body> node.
Select All Descendants (or self)
//p
The // prefix here is short form for selecting “descendant-or-self,” which basically means select the current node or any node below it in the tree that matches.
In our HTML example, from the root level context we would select all the p elements in the document.
Attribute Selectors
//*[@id="page-title"]
In our HTML example, this will select any nodes with the id attribute that equals page-title.
The equivalent to this in CSS would simply be #page-title.
Similarly, to target a CSS class you could use:
//*[@class="class_name"]
Although this won’t work in situations where there is more than one class on the node/element. For that you need a workaround like the one described here.
Using XPaths with Robot Ninja
Where XPaths come into play with Robot Ninja is with our Custom Selectors. You can use XPaths instead of CSS to define what Robot Ninja targets when running checkout tests for your store.
This is particularly useful with custom themes where standard WooCommerce CSS classes and attributes may not be used.
Any example where we use an XPath by default is when targeting all the Product Variation Dropdown menus (variable products can have multiple drop downs):
//*[@class="variations"]/descendant::select
This allows us to create a node-set of all the select elements that are descendants of the node with class variations. (In the default WooCommerce templates this is a table)
Useful Tools
If you are interested in learning more or having a play with XPaths, I’d recommend the following resources/tools:
1. XPath Cheat Sheet
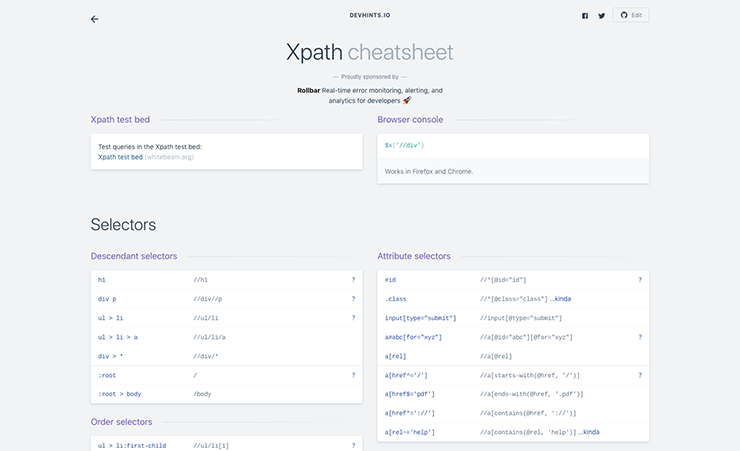
I have this cheatsheet bookmarked and refer to it regularly. It provides some great prompts and examples of both the basic and more advanced XPath syntax.
2. XPath PlayGround
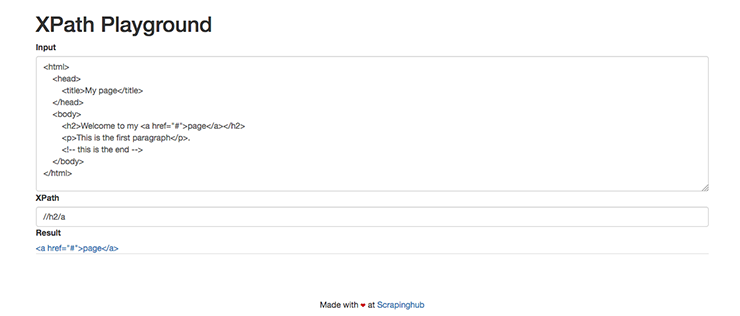
A really simple and useful tool for trying out XPaths. If you are like me and learn by trial and error, this provides a really great way to do that.
Wrapping up
We’ve only just touched the tip of the iceberg when it comes to XPath. As I mentioned, there is a very verbose syntax but it’s well-worth spending time investigating it more.
If you do need a little extra help setting up Customer Selectors with Robot Ninja, we’re always here to lend a hand! Just get in touch with support.
For those seeking a little more info, I’d recommend:
- Using XPath to select elements – Parsehub.com
- An Introduction to XPath: How to Get Started – The Scrapinghub Blog
- Introduction to web scraping: Selecting content on a web page with XPath – LibraryCarpentry
- XPath Tips From the Web Scraping Trenches – The Scrapinghub Blog